Grounding and Cable Longevity
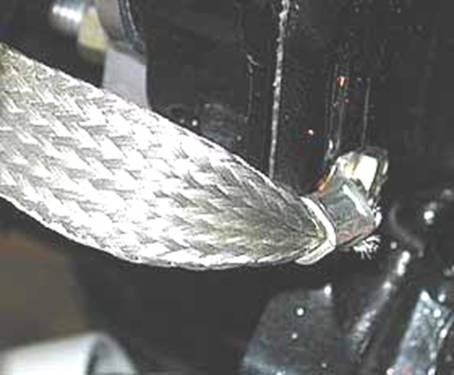
Does it seem like your Fiat or Alfa is going through clutch or accelerator cables at an alarming rate? Check to see if the cable in question is getting unusually hot after the engine has been running for a while. If so, it is probably the lack of a ground cable between the engine and the body which is causing the high failure rate.
All Fiats, Alfas and Lancias should have a ground cable running from the body to the transmission bell housing. In the absence of this cable, the ground is effected through speedo or clutch cables, which aren't heavy enough for this task. They in turn overheat, become embrittled, and fail.
Courtesy of International Auto Parts
Installing Rear Callipers on Your Fiat
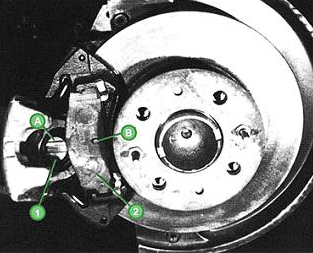
When you’re installing rear callipers on a Fiat, there are a few things you should be aware of before you start the job. Refer to the illustration at left.
The factory manual suggests that to fully seat the piston (1) in bore, you should push on it with a blunt object, like a hammer handle. Sometimes this works, but sometimes it doesn’t. If it doesn’t, you can screw it in clockwise until the piston is fully seated.
The piston must be in the position shown in the illustration, with the groove (A) at the top towards the bleed screw, and the slot below parallel to the knob (B) on the brake pad (2).
On 124’s, the vehicle’s weight must be on the axles, otherwise the compensator will stay closed and the rear brakes will not bleed properly.
Replacement of the Horn Relay
Fiats through the mid seventies all use a three terminal horn relay, which is now long discontinued. The most common brand is Fiamm, though you'll also find Sipea or Mixo. Here's how the original relay works: Terminal 87 connects to the horn. Terminal 30 is the power supply from the battery. As you can see, it is bridged inside the case to provide power to the electromagnetic coil as well. Terminal 85 is connected to the horn button, which grounds at the steering wheel when depressed, thus completing the circuit and activating the electromagnetic coil in the relay, causing the points to close and the horn to blow.
This is how you substitute a readily available four terminal relay in place of the three terminal relay:
Power lead to horn on terminal 87 as original.
Power supply from battery on terminal 30 as original.
Ground lead from horn button on terminal 85 as original.
Connect a jumper wire from terminal 86 to terminal 30, thereby providing power for the electromagnetic coil.
Beep Beep-You're done!
Update Your Fiat’s Alternator
If you’ve installed an aftermarket stereo system, fog lamps or halogen headlamps in your early (1977 and older) Fiat, you may have realized that you need a little more power to make those new additions work properly. The 1977 and later Fiats came with an internally-regulated alternator that produced 65 amps, which is a good bump in power compared to the earlier 45 to 55 amp models. The early cars can be converted over to the later-style alternator, which will give you the power you need to run those additional electronic devices. With a little expert advice from your local auto electrician, you can even install it yourself. Safety is essential, so be sure to disconnect the battery before beginning to work on your alternator.
The 65 amp (1977 and later) Fiat alternators are internally-regulated and have two connections: one for power, which goes to the 6mm stud; and the other, which is for the charge light and has a male connector.
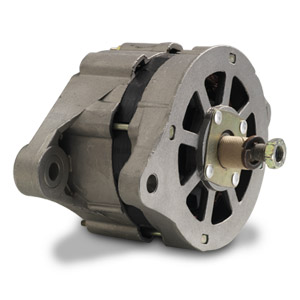 After you've removed the old alternator and bolted in the new one, connect the black power wires to the 6mm stud on the back of the alternator; then connect the yellow or yellow/red to the male terminal. Leave the grey wire disconnected, since it's no longer needed. After you've removed the old alternator and bolted in the new one, connect the black power wires to the 6mm stud on the back of the alternator; then connect the yellow or yellow/red to the male terminal. Leave the grey wire disconnected, since it's no longer needed.
When doing this conversion, you don't need the relay, so you'll simply bypass it. For the light to work properly, disconnect wires 85 (yellow or yellow/red) and wire 30 (violet/white) and connect them together.
Make sure to start your car and check the voltage output. It should be a minimum of 13.5 volts. You may have to bring the RPM above idle for this reading.
All that's left to do is crank up the stereo and hit the road!
Courtesy of International Auto Parts
Other things to check when you’re replacing a transmission
Whenever you remove a transmission from any Fiat, Alfa Romeo or other Italian car, there are a few parts you should consider replacing and a couple you should definitely replace. Let’s cover replacing the transmission first.
There are two things that you must have when installing a rebuilt transmission. The first is gear oil, which is available from most Auto outlets. You can use the original Shell SPIRAX HD or you can use Castrol gear oil .Whichever one you choose, you’ll need look at your owner’s manual for the correct quantity before doing the job.
The next part you will need is a rear transmission mount. Removing the old mount from your core transmission without damaging it would be very difficult. Neither of these parts is included in the price of our rebuilt transmissions, so don’t forget to order gear oil and a transmission mount to go with your new transmission.
There are several parts you should consider replacing whenever the transmission is out of the car. We’ll start at the front of the car and work our way back.
- The rear crankshaft seal is the first part on the list. On any car with some age or mileage, you should take this opportunity to inspect the seal closely for any moisture. Keep in mind that replacing this seal will mean removing either the engine or the transmission again, so you may want to replace it even if it’s not leaking.
- Take a look at the clutch and the flywheel. A simple visual inspection should tell you whether or not you need to replace them.
- The back-up light switch is also located inside the clutch housing, so this is a good time to make sure it’s working properly.
- You’ll want to take a look at the slave cylinder and the clutch hose. Once again age and mileage are the determining factors here.
- Now would also be a good time to replace your shift boots, since this is a much easier job with the transmission out of the car.
- Inspect the two bushings for the exhaust system. They are located on the drive side of the car just in front of the catalytic converter. Rubber tends to degrade over time, so check them for cracks and wear.
- The last part to check would be the flex disc. This is the large rubber disc that connects the transmission yoke to the driveshaft. Check it for cracks and wear.
Courtesy of International Auto Parts
About Metric Fasteners
This isn't a treatise on metric fasteners, but here are a couple of basics anyone working on a European car should know:
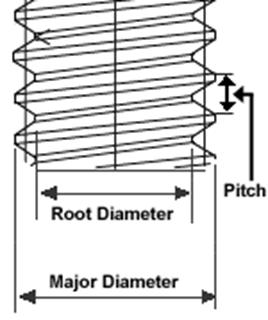
Metric nuts and bolts are specified by the diameter of the shank, in millimetres, and by the thread pitch, measured as the distance between thread crests or roots(peaks or valleys), again in millimetres. (By contrast, American-type SAE thread pitches are measured as the number of threads per inch.)
For bolts, you also specify the length from the underside of the head to the tip. A typical example: M8 x 1.25 x 30, which happens to be a course thread bolt 30mm long (its fine-thread equivalent would be M8 x 1.00). Note that you don’t generally specify a bolt by the head diameter. M6 fasteners usually take a 10mm wrench; M8 a 12 or 13mm wrench, and so on.
One more important fact: the little number you see on the head of a bolt (usually 5.8, 8.8, 9.8 or 10.9) tells the property class (strength), and any replacement must take this into account. If you were to replace a suspension bolt marked 10.9 with a 5.8-class bolt, its lack of adequate tensile strength could result in disaster!
Courtesy of International Auto Parts
Excessive Battery Current Drain
Most car models have a normal draw on the battery of less than 20 milliamps (.020 amps) with all electrical systems off. This draw (usually .010 - .020 amps) is caused by the electric clock, radio memory, etc. Aftermarket radios and burglar alarms may increase the draw above the average of .010 to .020 amps. As a rule of thumb, a 40 milliamps (.040 amps) draw will substantially discharge one of our batteries, if the car is not driven in 3 to 4 weeks.
To test the vehicle’s current draw:
- Remove the key and turn off all accessories, radio, etc.
- Close all of the doors and wait until the interior lamps turn off.
- Disconnect the negative battery cable at the battery.
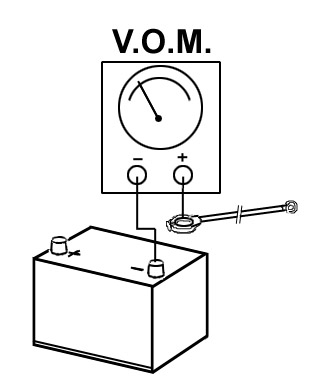
- Using a volt, ohm meter (V.O.M.), set the VOM to the highest amperage range.
- Connect the V.O.M. in series with the negative battery cable and the negative post of the battery (black lead to the battery post and the red lead to the negative battery cable). (See illustration.)
- If current draw is above the 10 to 20 milliamps draw, then remove one fuse at a time until the draw decreases to the 10-20 milliamps spec. Not all components are fused, so if the current draw is not reduced by pulling fuses, disconnect the leads, one at a time, to the non-fused components.
- When the current draw is reduced by removing a fuse, then a component(s) on that fused circuit is causing the draw.
- To diagnose which component(s), simply replace the fuse and disconnect the leads to each component in that circuit, one at a time, while observing the V.O.M. for a current reduction.
Keep it in the Trunk!
You don’t see a lot of old Italian cars on the road every day, which is one of the great things about owning one. Unfortunately, that’s also why it’s getting harder to find parts at neighbourhood auto spares stores.
Whether you’re planning a long-distance trip or just an afternoon drive in the country, there are a few key parts that you should have on hand in case of a roadside breakdown. Why let a simple problem ruin a wonderful drive?
You don’t necessarily need go out and buy all of these parts new. Just keep some of the parts you replace during routine service. If they’re still in usable shape, they could help get you back home one day.
Cooling System
Keep a usable set of belts and hoses on hand. Used parts are fine in this case, because your primary concern is just getting the car home. You might also consider keeping a spare radiator cap and a thermostat in your “emergency bag.”
Ignition System
A cap, a rotor and a set of spark plug leads are always good things to have. Once again, used parts will work fine here..
Other Items
We have found that the European-style fuses (as used in pre-1986 cars) are increasingly difficult to find in local stores, so keep a good assortment in your car at all times. A small assortment of tools is important, and a box of disposable gloves can help keep a messy situation from getting worse.
GENERAL SERVICE
-
Do a "mini safety inspection" (< 5 minutes).
Check all turn signals, tail lights, brake lights (you may need a helper), side marker lights, headlights (bright & dim), license plate lights; make sure the brake, charging & oil pressure warning lights come on when you turn on the ignition; check that the horn & wipers work.
-
Lubricate door, hood & trunk hinges (< 5 minutes).
You can use a spray can of white lithium grease, available at any auto parts store. Wipe off any excess, so it doesn't get on clothing.
- Rotate your tyres (20 - 30 minutes).
This is especially urgent if the treads are beginning to wear unevenly but you should tackle this chore on a regular basis. If the wear is bad go and have it checked by a professional.
Check your wiper blades (< 5 minutes).
Inspect wiper blades for frayed edges, hardened rubber, or just replace them if they're more than a year old.
-
(Alfa Spiders) Check convertible top drain hoses (< 5 minutes).
Next time you wash your car, watch that water drains from opening in the rear of the rocker panels. If your car has a sunroof, check their drain hoses by pouring a small amount of water into each, and ensuring that the water disappears down the hoses.
UNDERHOOD SERVICE
-
Visually inspect all belts & hoses (< 5 minutes).
Look for cracking and bulging of water, fuel and vacuum hoses. The theory is: it's easier to replace them in your garage or driveway than on the side of the road. Since "your" cars are all over 10 years old, any original vacuum hose is probably getting brittle. Belts have a habit of flying off at bad times, too, so check them. If your car has a timing belt (Alfa V6 or Fiat/Lancia), you should make sure it's not oil soaked, and be sure it's changed at the correct interval
-
Check brake & clutch master cylinder fluid levels (< 5 minutes).
You can see the level through the translucent reservoirs. If you need to add some, use fresh brake fluid (brake fluid absorbs moisture from the air, even if the bottle is sealed).
-
Visually inspect your spark plug & coil wires (< 5 minutes).
Any problem here can hurt power and mileage, (Hint: in total darkness, you can sometimes spot a damaged spark plug wire leaking sparks to ground.) If you want to investigate plug wires further, you can check the resistance with an ohm meter and compare against the specs in your workshop manual.
-
Check your air cleaner (5-15 minutes).
Remove it for inspection; if it's dirty, replace it or at least blow it out from the inside with compressed air. If you have a K&N filter, clean and re-oil lightly.
-
Top up your windshield washer bottle (< 5 minutes).
You may wish to check the "aim" of the windscreen washers; they can typically be re-aimed using a needle or straight pin.
-
Change your oil and filter (20 - 30 minutes).
How long has it been? Do it soon.
UNDER THE CAR
-
Do a visual inspection of the brake rotors, callipers & pads (15 - 30 minutes).
Combine this with rotating your tires, and the incremental time is near zero. If you're like me and can't see up close as well as you once could, you may need a mirror to peer into the brake callipers to check pad thickness. I like to be sure the friction material on each pad is (at least) thicker than its backing plate. Check the rotors for scoring and minimum thickness. Look for signs of fluid leak from hoses and callipers. On Fiats, check that the angled calliper sliders are not corroded. One sign of this is the pads on that wheel are not wearing evenly. If you're in doubt about the age or condition of any brake component, it's wise to change it.
-
Check shock absorbers and/or struts (15 - 30 minutes).
While the car is jacked up, examine all shock absorbers for signs of leaking (be sure to secure it with jack stands). While you're at it, check each wheel for leaking grease seals, and, where applicable, check CV and steering rack boots. Then, with the car back on the ground, push down on each corner with all your weight; making sure the car rises back up on its suspension and settles down without multiple iterations.
INSIDE THE CAR
- Condition leather and vinyl components (15 minutes).
We recommend Armor all products to clean and condition leather and interior vinyl. Be sure you don't use a really shiny vinyl dressing on the top of your dashboard; the sun reflections will drive you nuts.
- Re-dye black trim (30 minutes).
Use Armor all on your rear spoiler (80's Alfa Spiders) or any other black plastic and vinyl. It may take 2 or 3 coats to achieve an even effect, but it makes a world of difference to your car's appearance. If you get it on paint, wipe it off immediately.
-
Lube your door & trunk gaskets (< 5 minutes).
Wipe Armor all on soft rubber seals to keep them flexible.
-
Lube seat tracks (< 5 minutes).
We just use white lithium grease, available at any auto parts house. Don't get it all over the carpets, and wipe off any excess.
-
Clean the inside of your windows (15 minutes).
What a difference it makes to get that film off the inside of all the glass. Don't forget the mirror. We recommend a haze free glass cleaner
Adjusting Valve Clearances - Alfa Romeo 4 Cylinder
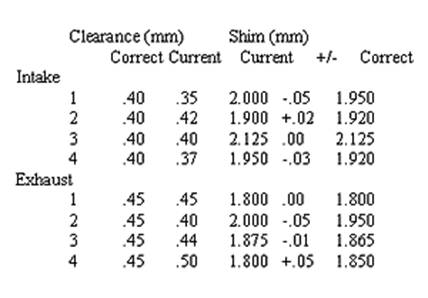
You'll need a proper service manual, a metric feeler gauge,a micrometer and–for Fiats–the proper shim removal tool. Start by filling out a chart like this (these numbers are from a typical 4-cylinder Alfa; the concept is similar for Fiats):
Consulting your manual, first write in the factory-recommended clearances in the “correct clearance” column. Next, following the procedure in the service manual, measure the clearance between the heel of each cam lobe and its tappet, and record your findings in the “current clearance” column.
Consulting your manual, first write in the factory-recommended clearances in the “correct clearance” column. Next, following the procedure in the service manual, measure the clearance between the heel of each cam lobe and its tappet, and record your findings in the “current clearance” column. Then compare these measurements with factory specs and record the variance in the +/- column. Now, measure the thickness of the existing shim with your micrometer, recording this in the “current shim” column. Add or subtract the value in the +/- column to (or from) the current shim size. The resulting figure is the shim needed to restore proper clearance. Round up or down to the nearest size. Alfa shims are graduated in .025mm steps, Fiat shims in .05mm steps. If a valve is split evenly between two sizes, round downward (it's safer to have a valve a bit too loose than too tight).
The Coil – Ignition Basics
The ignition coil is the source of high voltage needed to make current bridge the gap of the spark plug in the combustion chamber. It is a pulse-type transformer, and here’s how it works:
Inside the coil case are two sets of windings: the primary, several hundred turns of heavy wire; and just inside it, the secondary, several thousand turns of fine wire. These are wrapped around an iron core in the centre. When battery current is conducted through the primary winding, a strong magnetic field develops around the iron core. When the flow of current is interrupted, the magnetic field collapses across the secondary winding. As the secondary winding has more turns than the primary, high voltage is induced into the secondary winding. This high voltage then shoots out of the centre terminal of the distributor, which is attached to the iron core.
The customary ways in which current flow is broken are by contact breaker points, or in later cars by an electronic switching device inside the distributor.
How to Test an Ignition Coil
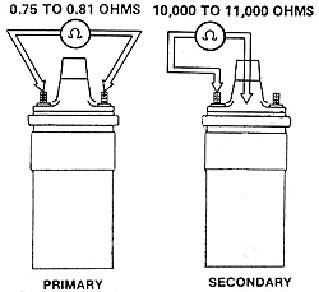
This testing procedure is valid for most automotive coils. Using an ohmmeter, check the resistance between the side terminals of the coil. Do this with all of the wires to the coil disconnected. You should see 0.75 to 0.81 ohm of resistance. Then check the resistance either side of the terminal and the centre high tension terminal. The reading should be 10,000 to 11,000 ohms. Any significant deviation from these numbers would indicate that the coil is defective.
Cooling System Bleeding on Fiat Twin Cam
CAUSED BY COOLING SYSTEM AIRLOCK, PLEASE EMPLOY THE FOLLOWING PROCEDURE WHEN REFILLING THE COOLING SYSTEM:
1. Raise front of car and support safely on jack stands. It must be high enough so that the radiator filler neck is the highest point in the cooling system.
2. Place heater temp lever in the ""heat"" position.
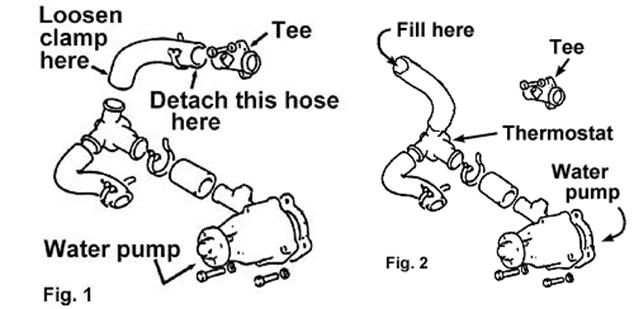
3. At cylinder head tee (see Fig. 1) detach the hose that runs down to the thermostat.
4. Loosen the same hose at the thermostat, but do not remove. Rotate the hose on the thermostat 180 degrees, forming a filer spout (see Fig. 2).
5. Pour coolant into the hose until it begins to run out of the cylinder head tee.
6. Replace the hose on the tee and tighten the clamps.
7. Continue slowly filling the cooling system through the radiator until it is full.
8. Leaving the radiator cap off, start the engine and allow it to run until the lower radiator hose is very warm and the temperature gauge reads near the centre of the scale. This indicates that the thermostat has opened.
9. Lower the car, top off the cooling system and replace the cap.
Car Storage Tips
- Probably the easiest way to store a car is to not store it at all. If you think you can drive your car (not idle it in the garage) at least once every 4 weeks for a minimum of 30 minutes at a time, then you and your car are better off without the deep storage routine. But for those who store there cars during the winter months, and choose to bring them out again when the sun returns, storage is the only option. What follows is sort of a punch list of tasks to perform:
- Warm car up fully. On your drive, go to the auto parts store and buy Lucas Fuel and Oil Treatments. Use products as per instructions. Use in the fuel tank the fuel treatment and then fill the tank up completely with fuel. Don’t use all of The Lucas Oil Treatment when changing your engine oil as some will be used as an upper cylinder lubricant. Probably keep about 4 – 6 tablespoons.
- Change engine oil and filter. Owners don’t forget use only manufacturer specification products.
- Drain/flush cooling system. Ensure that the heater valve is open. Refill cooling system with a 50/50 mixture of fresh antifreeze and distilled water.
- Top up trans/differential/steering box. Transmission and differential oil should be changed every 30,000 kilometres; now is the time if that service is due. We recommend you use the correct manufacturer specified grade of oils.
- Top off brake fluid. Braking system should be flushed and bled with new fluid every 2 years; do so now if it is time.
 Wash and wax paint and chrome work. Thoroughly clean inside of car. Wash and wax paint and chrome work. Thoroughly clean inside of car.- Remove battery and clean battery and battery case with a solution of baking soda and water to neutralize acid. Take battery inside and place on an automatic trickle charger which can be purchased from such places as Repco or Super Cheap Auto parts.
- Push (or temporarily reinstall battery and drive) car into storage area which hopefully is indoors. If you are storing the car in an area with an earth or gravel floor, lay a big piece of plastic down first, and then drive the car onto that. The plastic sheet will provide a moisture barrier and help keep the car from rusting.
- Raise the car on jack stands. Place the jack stands under the various suspension components so that the suspension is compressed and at normal ride height. We've found that fully extended shocks tend to get stuck in that position, hence the last instruction. If space is tight in your garage, you can rest the car on a set of auto dollies so you can move it easily into a corner.
- The Lucas Oil Treatment we held in reserve? Now comes the time to use it. Pull the spark plugs out of the engine, pour a tablespoon Lucas Fuel Treatment in each cylinder, and turn the engine over by hand several revolutions in order to spread the Lucas Oil Treatment around the cylinder walls. Reinstall spark plugs.
- Slip a plastic bag over the exhaust tip(s) and snap a rubber band around it to hold it on/closed. Do the same to the air cleaner inlet. This will help keep moisture out of the engine.
- Place a couple of mothballs in the trunk, the interior, and the engine compartment. Hopefully this will dissuade little furry creatures from building nests. Consider a set of inexpensive Door Edge Protectors that adhere to the sides of your car with suction cups. Then fit a quality car cover, preferably from IAP! An even better solution is to cocoon the car and cover in a Car Pocket. If the car is being stored indoors, crack the windows about 3/8".
- Finally, if possible, rotate the drive axles a few turns once a month. This will help to keep the differential gears and transmission main shaft and countershaft coated with oil.
|